The Best in its class

Moto G is best phone in its price range, stuffed with features which are unmatched by any of its competitor.If you own it then you are at the right place.

Getting Started

Welcome aboard to the World of Moto G. Here are some essential Tips for you to get started with you lovely Moto G.

Android™ 4.4.2, KitKat® is HERE!

GOOD NEWS! Motorola has announced the Android™ 4.4.2, KitKat® for the Moto G as promised. Here are all the details of the UPGRADEs done and how to get the KitKat for you moto g.

Get Moto X style voice activation on Moto G

The Moto X is always listening for your voice and you can command Google Now without having to touch your phone first. Unfortunately that’s not a standard feature of the Moto G. Here we show you how to get that feature.

Get FM on your MOTO G

Listen to your favorite FM radio stations for free on your Moto G. Motorola FM Radio makes it easy to scan for stations, build your favorites list, and see live information about what’s playing -- all with a simple swipe-based navigation.

Sunday 23 March 2014

Transfer All Contacts from Nokia to Android

I bought my first Android phone this February. Of course, it is Moto G. My earlier phone was Nokia N73. Though Moto Assist is provided, but it is of no help since it assist you to transfer contents from only iOS or Android. I was in desperate need of an app which could help - but could not find one.

I knew that all contacts are saved as .csv on a Nokia phone, which is a standard format around the world. Just tried shifting contacts using bluetooth and voila! it all happened. Please follow the steps below:

Steps:
1. Go to contacts in your phone.
2. Press options and select mark all.
3. Press options again and click send via bluetooth.
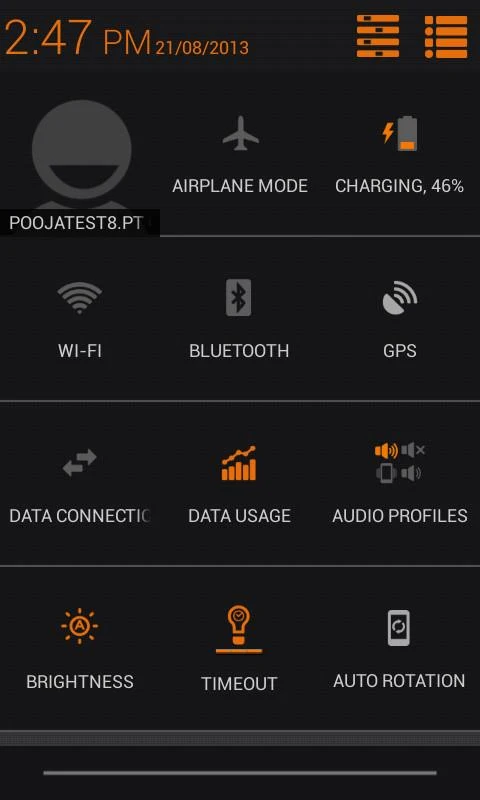
4. Turn bluetooth ON on your Android device.

5. Make it visible from the bluetooth settings.

6. Finally select the Android device on your Nokia phone.

If you aren't able to send all of your contacts in one go, then do it in chunks as I did. Like, first select the ones from A, then from B, and so on.

7. Once all the contacts are received in your Android phone, you can click on individual contacts to save them.
8. Or, touch the dialer, click on options-3-vertical-dots, the click on import/export.


9. Now click on import from storage.

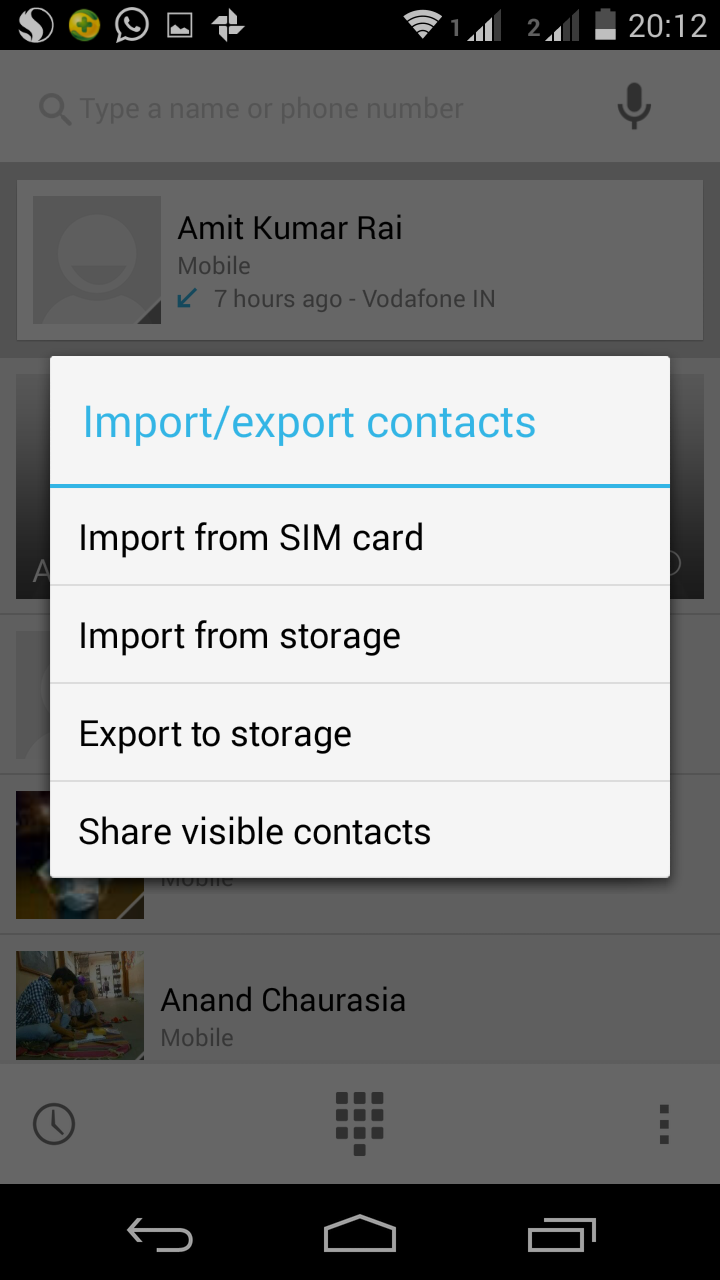
10. Click on import on one vCard, or multiple vCard, or all vCards.


11. Wait until all contacts are updated. Maybe you'd want to restart your phone once importing is done.

And there you go! It's all done.

Note: For non-bluetooth phones all you have to do is somehow get your contacts from your phone to a computer and then transfer all your contacts.

Sunday 9 March 2014

Perform Calculation Using your Handwriting - MyScript Calculator

Yes, you heard me right now you can  perform mathematical calculations just by simply writing on your device's screen. The MyScript Calculator app developed by Vision Objects can perform most of the mathematical expression and calculations just by recognizing your handwriting.

Following are the Supported Operations by MyScript Calculator:

Basic operations: +, -, x, ÷, +/‒, 1/x 
Misc. Operations: %, √, x!, |x| 
Powers/Exponentials: ℯx, xy , x2 
Brackets: ( )
Trigonometry: cos, sin, tan
Inverse trigonometry: acos, asin, atan
Logarithms: ln , log 
Constants: π, ℯ, Phi.

This app is available for free on the Google Play Store click the button below to get you there.


Friday 7 March 2014

musiXmatch Music Lyrics Player


musiXmatch is the #1 Music Lyrics Player on Google Play Store and iTunes with +20 million users in the world and the largest and most exhaustive official catalog of synchronized lyrics for karaoke passionate and for singing.


Key Features


★ Sing Along with song’s removal ( 4.1 +) and Live Pass 
★ Super Offering: Equalizer+Add Coverart - SAVE 60%
★ NEW: Now Support Spotify, Deezer Notification (scrobbler)
★ Remove Ads option
★ Last.fm Scrobbling, Social Share
★ Super Fast MusicID for unlimited Shazam-like tags with Lyrics
★ Search for Lyrics by typing words, artist name, song title,
★ Get instant Lyrics notifications from other music players
★ Better responsiveness, multi window, id3v2, Sonos support


XThemes


Theme Changer application for A500s
Switch to your favorite theme from XThemes application.
Contains Pre-bundled themes and down-loadable online themes.
The latest version of XThemes v2.0 provides instant notification on availability of new online themes.


RE-VOLT 2 : Best RC 3D Racing


The new and improved version of the intriguing racing game!
Many fun stages! Thrilling racing missions! The Grand Prix race for players around the world!


▶ An eye-opening experience for all RC maniacs.
- Various models of real-looking RC cars!
- Formula cars, sports cars, monster cars, and trucks! 
Enjoy the realistic touch of controlling an actual RC car.

▶ Upgrade and skin system!
- You can upgrade the top speed, accelerating force, handling, and stability for each car.
- You can choose unique skin for your car to express your personality.

▶ Challenge Mode!
- A wide selection of fun single race games.
- Clear various stages of mission to win the cup.

▶ Grand Prix Mode!
- Compete with your friends and other players around the world.
- Enjoy breathtaking races with 50 players in your group on 5 new tracks each week. 
- You can also see the unique cars built by your friends and other players for even more realistic racing.


GAMEPLAY VIDEO


Thursday 27 February 2014

Save battery of your MOTO G

Snapdragon™ BatteryGuru is a battery life saver app that extends battery performance and improves overall user experience by intelligently making changes that optimize device functionality in phones with Snapdragon mobile processors. This app:
• Delivers longer battery life with fewer charges, acting as a battery life extender
• Intelligently learns how you use your Snapdragon-powered smartphone and optimizes your device without disabling smartphone functionality
• Requires no user configuration - Snapdragon BatteryGuru automatically learns and adjusts the smartphone settings so you don’t have to

After a brief 2-4 day introduction period, Snapdragon BatteryGuru learns the user’s behaviors and then notifies the user that it is ready to extend the battery life and improve the experience. Snapdragon BatteryGuru continues to operate in the background, deepening its understanding of the user and further optimizing the experience over time.

Download 


Screenshots


Transfer SMS from NOKIA to Android Mobile


Have you migrated from a Nokia (Symbian) to Android and want to transfer all your CONTACTS and SMS to your new ANDROID PHONE. I recently used this method to transfer all my MESSAGES and CONTACTS from my Nokia N73 to my Moto G and it worked 100%.


Prerequisites: 

Procedure:

  1. Connect your Nokia handset and start Nokia Suite on your PC.
  2. Create a backup.nbu file (it doesn't matter what you select for backup, as long as it includes messages) which can be done using Nokia Suite and by default it is stored in somewhere in my documents folder.
  3. Run NbuExplorer.exe > File > Open > Browse to your .nbu file and open it.
  4. Go to the Messages tab and click on “Export Messages” button located above the table on the right pane.(Refer following Image)
  5. In the “Save as type” field, select (*.xml) and save the file.
  6. Now the tool 'XML2Android.exe' which you downloaded from above given link in Prerequisites helps convert the .xml  file created by above step to the format accepted by the Android App - SMS Backup & Restore.
  7. Save the tool in the same folder where you saved the .xml file.
  8. Open the command line console (Win7: Start > type “cmd” and press enter).
  9. Change directory to the directory where you saved the files (Type this Command in CMD: CD C:\Directory of the folder where .xml file and XML2Android.exe is saved ).
  10. After the directory is changed to the desired folder type this commands in CMD: XML2Android <yourfile.xml> (e.g. XML2Android my_sms.xml).
  11. This will generate a file called AndroidSMS.xml, copy this file to your Android phone.
  12. On your Android mobile, download the SMS Backup & Restore app from Google Play and then select export sms file and you can get your messages back.
NOTE:  If the AndroidSMS.xml file didn't work then try renaming the.xml file created in Step 6 above to AndroidSMS.xml and send this renamed file to your Android Device and use SMS Backup & Restore app.

Please ask any doubts regarding this tutorial in the comments below.

Tuesday 25 February 2014

How to replace the Stock Camera & Gallery with NEXUS 5 AOSP version Camera (ROOT Required)

If you want your camera app on your Moto G to be like the one on the NEXUS 5 follow the steps in this tutorial.

Note: Your Device Must be ROOTED

Follow this steps on your behalf, we don't take responsibility is something goes wrong.

This Tutorial was performed on SOLID EXPLORER (Play Store Link)


Instructions:

1. Download the zip file (Click Here) and extract it. Inside should be two files, GalleryGoogle.apk and GoogleCamera.apk. Copy them to the internal storage of your phone.

2. Download Solid Explorer from the play store. Open it up and hit the jump button at the bottom, then device, then system root.

3. Now scroll down to the system folder, tap it and go into the priv-app folder. Scroll down till you see four files - MotCamera.apk, MotCamera.Odex, MotGallery.apk, & MotGallery.odex. For each one, hold down on it until the option to Rename it pops up, then add ".bak" to the end of each one. (example, MotCamera.odex = MotCamera.odex.bak) SuperSU should pop up asking for root access, grant it of course.


4. When you're done renaming, hit the jump button again, then device> Internal Memory. Inside should be your two files you downloaded earlier. Hit the actions button at the bottom, then select, and highlight the 2 files and hit the copy button at the bottom (the 4th one that looks like two little papers). Now hit Jump> Device> System Root and go into the system folder, then the app folder. Hit actions again and Paste.

5. Stay in the system/app folder, now find you two files you just pasted, and hold down on one of them, then tap Properties, and where it says Attributes hit change. You should only have 4 check-marks here: Read for Owner, Group, and Other... and Write for Owner. Anything else thats checked, uncheck it. Hit ok and do the same for the other one.


7. Now reboot and your'e all done! Now you have a less crappy camera and a smoother gallery app!

File manager for your powerful phone, Moto G.

FILE QUEST GOT FEATURED ON XDA-DEVELOPERS.COM,AND BEING LIKED BY THOUSANDS OF USERS..
http://www.xda-developers.com/androi...rule-them-all/

Description

3D is not a cup of tea only for HOME LAUNCHERS,now experience the 3D LISTVIEW in file manager for rooted and unrooted android devices........
File Quest is world's first File Managing app having 3D Listview.Root enabled,gives the flexibility to do app backup of user and system apps at one click.Share multiple apps via Email directly from installed location.Extremely fast,robust and beautiful app for managing files on your android device.


Download:

Play Store Link

Key Features:-

** 3D LISTVIEW FOR FILE GALLERY.
** ROOT Support.
** Dropbox Integration.
** Minimizable download or upload operation on dropbox.
** UNIQUE TRANSLUCENT THEME.
** UNIQUE SETTINGS MENU IMPLEMENTATION.
** CAN MAKE ZIP OF APPS THAT CAN BE FLASHED IN CLOCKWORK RECOVERY MODE.
** FLASHABLE ZIP CAN BE CREATED TO INSTALL APPS AS USER OR SYSTEM APP.
** Share multiple installed app via email from app's installed location.
** You can adjust the transparency level of the app.
** Multi Select apps and then do multi backups and multi share of apps.
** Two menu bars - one at top and other at bottom to increase flexibility of file managing.
** You can select different folder icons.
** Four SwipeablePanels
** Can copy files from one panel to another panel.
** Can create zip file of selected file or folder.
** You can select the default app for a file type and change it as you like from settings menu very easily.
** It has got root rights.
** First Panel organizes and displays your files in categorised manner.
** Second Panel For root users.
** Third Panel is for simple file browsing.
** Fourth Panel is basically the app manager kind of thing.
** Displays the downloaded apps with or without system apps.
** Takes the backup of both downloaded and system apps either in one selection.
** Takes the backup of both downloaded and system apps one by one also.
** Capable of creating zip file of app that can be used to flash either as user or system application.
** Can send directly the installed app via bluetooth to other device.
** Can filter out a file from current list of files.


Screenshots:


Get Google Experience Launcher on your MOTO G

Screenshots of Google Experience Launcher:


Google has pushed out an update to the Google Search app, which now means there's also an update to the Google Experience Launcher. We've got the APK for you to install below, and this is looking like a substantial update – it looks like the new (and probably official) name for the Google Experience Launcher is Google Now Launcher.

What's New

Google says:

*Bug fixes and performance improvements

We say:

*New Google Now Launcher name with splash screen on start up
*6 columns on tablet home screens (up from 5)
*AirBNB reservations in Google Now
*Fixes disappearing icon in the hotseat bug
*Hotword ("OK GOOGLE") detection now works in British and Canadian English
*Icon imports from old home screen


Be aware, you need to have the Google Home stub app installed to see the Google Now Launcher. This branding also doesn't show up on the Nexus 5, which already has the new launcher installed by default.

APK Download

The APK is signed by Google and upgrades your existing app. The cryptographic signature guarantees that the file is safe to install and was not tampered with in any way. Rather than wait for Google to push this download to your devices, which can take days, download and install it just like any other APK.

File name: com.google.android.googlequicksearchbox-3.2.16.1006154.arm.apk

Version: (Android 4.1+).

mirror #1
mirror #2
mirror #3
mirror #4

Source: XDA-Developers


Monday 24 February 2014

How to enable USB DEBUGGING in ANDROID 4.2 and later (ANY PHONE)


Wondering were are the Developer Options in your latest Android? Don't worry Google has hidden it for whatever reason but in this tutorial we will help you get access to the developer options.

Follow this Steps to get access to Developer options:

  1. Go to Setting>About Phone.
  2. You'll find this screen

    3.  Tap Build Number seven times to unlock the developer                     option.        
   4.  Now Tap back button and you'll find the Developer Options in         Settings.
   5.  Once Developer Options are enabled they are Permanently               there under the Settings menu, you don't have to repeat these           steps to access developer options.

Let us know in the comments below if you got any problem doing these steps.

How to UNROOT your MOTO G


So, you have rooted your phone but want to revert back to the stock firmware? This guide will show you how to UNROOT your MOTO G.

Note: Unrooting might erase your data its mandatory to keep a backup of your data.


Disclaimer: Follow this steps at your own risk, we don't take responsibility if something goes wrong.


UNROOT:

Before you begin Download the following files:

Follow this steps to get you MOTO G UNROOTED:

  1. Install all the Motorola Drivers which you have downloaded from the above link.
  2. Extract the Stock Firmaware and also the Fastboot, preferably on your Desktop.
  3. Turn on USB debugging on your MOTO G.
  4. Connect your MOTO G via a USB CABLE to your PC.
  5. Click START on your PC and then type CMD.EXE(WINDOWS 7 or LATER) for XP goto START>RUN>CMD.EXE and press ENTER).
  6. Type the following in the command prompt: 
                  adb reboot-bootloader 
    
   7. After your device is booted into bootloader mode type the following codes in the Command Prompt and press ENTER after every command and make sure it returns OKAY.


mfastboot flash partition gpt.bin
mfastboot flash motoboot motoboot.img
mfastboot flash logo logo.bin
mfastboot flash boot boot.img
mfastboot flash recovery recovery.img
mfastboot flash system system.img_sparsechunk1
mfastboot flash system system.img_sparsechunk2
mfastboot flash system system.img_sparsechunk3
mfastboot flash modem NON-HLOS.bin
mfastboot erase modemst1 
mfastboot erase modemst2 
mfastboot flash fsg fsg.mbn
mfastboot erase cache 
mfastboot erase userdata 
mfastboot reboot
                   
 VOILA! Back to the Stock Firmware.
Let US know if this worked for you below in the comments.

Reference : XDA Devlopers

    Saturday 22 February 2014

    How To ROOT your MOTO G


    The solution to root Moto G is already out in market by MoDaCo’s Paul O’Brien. Before you continue, remember:
      • Unlocking Bootloader may void your warranty
      • Unlocking Bootloader may reset your device(wiping your data)
      • Rooting Moto G may affect future updates

    We will not be responsible for any damage to your device. Follow the procedure on your behalf.

    Guide to Root Moto G:

    Rooting Moto G basically requires you to unlock the bootloader and then root your device.
    Steps to Unlock the Bootloader:
    Before starting, make sure you have downloaded the following drivers and tools:
      • Moto G drivers (Click here to download)
      • Motorola USB Driver (Click here to download)
      • ADB Tools (Click here to download)
    Now follow these steps to unlock the bootloader of Moto G:
    Step 1: 
    First of all, turn your smartphone off
    Step 2: 
    Now, boot it in fastboot mode by holding Volume Down and Power keys simultaneously
    Step 3: 
    Wait for a bit then repeat the last step
    Step 4:
    Now, connect your Moto G with PC via USB
    Step 5: 
    Run Command Prompt and navigate to the folder where you have unzipped ADB Tools
    Step 6:
    Enter the following command,

    fastboot oem get_unlock_data

    Step 7:
    A string of commands will appear, copy this string
    Step 8:
    Paste the sting in the input window on Motorola site (there should be no spaces)
    Step 9:
    Now click on ‘Can my device be unlocked?’, check the option ‘I Agree’ and then click the option ‘Request Unlock Key
    Step 10:
    An unlock key will be sent to your email
    Step 11:
    Enter the following command in Command Prompt:

    fastboot oem unlock {20 characters unlock key}

    Step 12:
    Moto G will automatically reboot with Bootloader unlocked
    Now, it’s time to proceed to root Moto G.
    Steps to Root Moto G:
    Before you begin, make sure you have downloaded the following file:
    • Superboot.zip (Click here to download)
    Here are easy instructions to root Moto G:
    Step 1:
    Boot your Moto G in Bootloader mode (by rebooting your device holding Volume Down and Power keys)
    Step 2:
    Run superboot-windows.bat on PC as Administrator
    Note:    For Mac, open a terminal window to the directory containing the files. Enter the following command,

    chmod +xsuperboot-mac.sh

    followed by,

    sudo ./superboot-mac.sh

    Step 3:
    Your device will now automatically restart with your phone rooted and with SuperSU app
    Congrats! You have successfully rooted the highly powered-budgeted smartphone i.e. Moto G.

    Friday 21 February 2014

    How to Fix: Wi-Fi won’t connect or drops Inexplicably on MOTO G


    It’s very common to run into Wi-Fi issues with any new phone. Some Moto G owners have encountered issues with connecting to various routers. There are some reports of excessive battery drain when changing between routers. Some people can’t get it to connect to their network at all. There are also several reports of the connection just dropping, even at close proximity to the router. There are an awful lot of potential causes for Wi-Fi problems, so try working through the suggestions below and hopefully you’ll find a fix that works for you.

    Solutions:


    1. That old IT support favorite – turn it off and on again. Try turning the Moto G off and the router off and then switch them both back on again. That will often solve your issues.
    2. If it still won’t connect at all, start by going to Settings > Wi-Fi and long press on your router, then choose Forget network. Scan again and re-enter all your details.
    3. If the connection keeps dropping, go to Settings > Wi-Fi > Advanced and consider changing two settings. Make sure Keep Wi-Fi on during sleep is set to Always. Make sure Avoid poor connections is not ticked.
    4. If battery drain is the problem, try Settings > Wi-Fi > Advanced and set Scanning always available to off.
    5. Make sure that your router firmware is up to date.
    6. To assess whether you need to change channels you can download the Wi-Fi Analyzer app and take a look how crowded it is.
    7. You could try changing the other settings on your router. You might want to make sure that MAC filtering is off, or add your Moto G’s MAC address (you’ll find it in Settings > Wi-Fi > Advanced). You could also try setting a static IP.