The Best in its class

Moto G is best phone in its price range, stuffed with features which are unmatched by any of its competitor.If you own it then you are at the right place.

Getting Started

Welcome aboard to the World of Moto G. Here are some essential Tips for you to get started with you lovely Moto G.

Android™ 4.4.2, KitKat® is HERE!

GOOD NEWS! Motorola has announced the Android™ 4.4.2, KitKat® for the Moto G as promised. Here are all the details of the UPGRADEs done and how to get the KitKat for you moto g.

Get Moto X style voice activation on Moto G

The Moto X is always listening for your voice and you can command Google Now without having to touch your phone first. Unfortunately that’s not a standard feature of the Moto G. Here we show you how to get that feature.

Get FM on your MOTO G

Listen to your favorite FM radio stations for free on your Moto G. Motorola FM Radio makes it easy to scan for stations, build your favorites list, and see live information about what’s playing -- all with a simple swipe-based navigation.

Showing posts with label How to. Show all posts

Sunday, 23 March 2014

Transfer All Contacts from Nokia to Android

I bought my first Android phone this February. Of course, it is Moto G. My earlier phone was Nokia N73. Though Moto Assist is provided, but it is of no help since it assist you to transfer contents from only iOS or Android. I was in desperate need of an app which could help - but could not find one.

I knew that all contacts are saved as .csv on a Nokia phone, which is a standard format around the world. Just tried shifting contacts using bluetooth and voila! it all happened. Please follow the steps below:

Steps:
1. Go to contacts in your phone.
2. Press options and select mark all.
3. Press options again and click send via bluetooth.
4. Turn bluetooth ON on your Android device.

5. Make it visible from the bluetooth settings.

6. Finally select the Android device on your Nokia phone.

If you aren't able to send all of your contacts in one go, then do it in chunks as I did. Like, first select the ones from A, then from B, and so on.

7. Once all the contacts are received in your Android phone, you can click on individual contacts to save them.
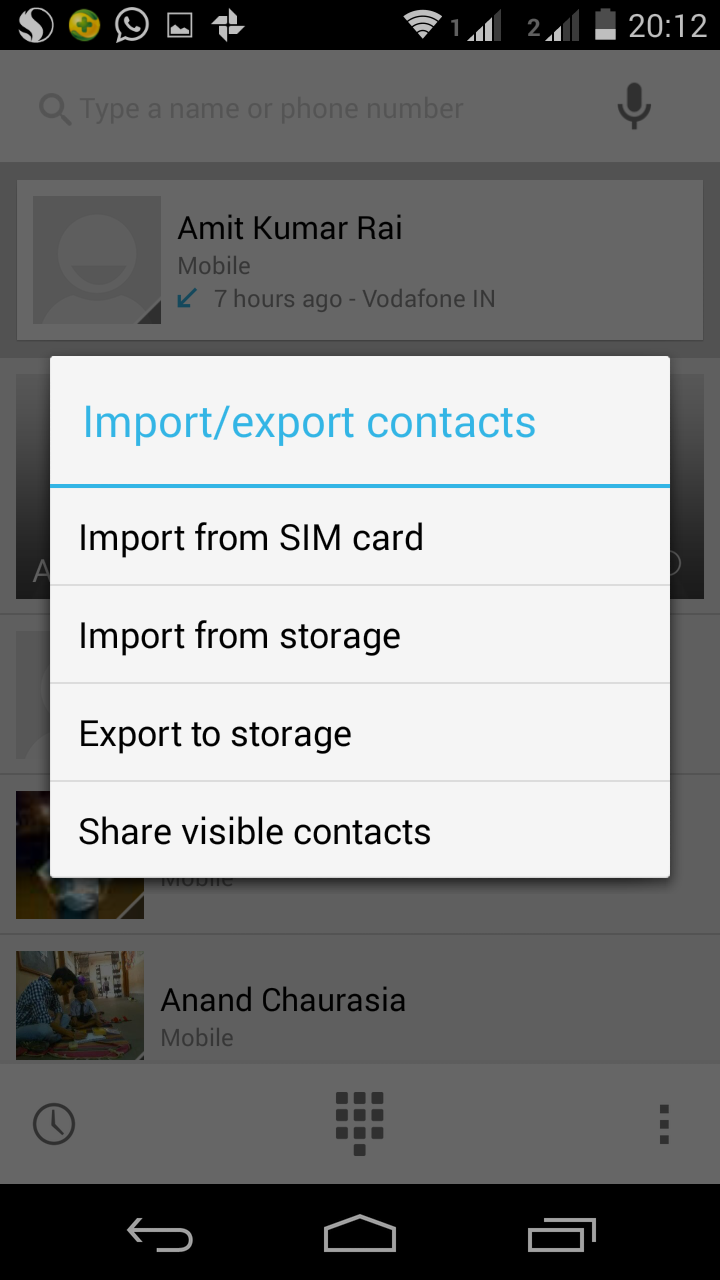
8. Or, touch the dialer, click on options-3-vertical-dots, the click on import/export.


9. Now click on import from storage.

10. Click on import on one vCard, or multiple vCard, or all vCards.


11. Wait until all contacts are updated. Maybe you'd want to restart your phone once importing is done.

And there you go! It's all done.

Note: For non-bluetooth phones all you have to do is somehow get your contacts from your phone to a computer and then transfer all your contacts.

Tuesday, 25 February 2014

How to replace the Stock Camera & Gallery with NEXUS 5 AOSP version Camera (ROOT Required)

If you want your camera app on your Moto G to be like the one on the NEXUS 5 follow the steps in this tutorial.

Note: Your Device Must be ROOTED

Follow this steps on your behalf, we don't take responsibility is something goes wrong.

This Tutorial was performed on SOLID EXPLORER (Play Store Link)


Instructions:

1. Download the zip file (Click Here) and extract it. Inside should be two files, GalleryGoogle.apk and GoogleCamera.apk. Copy them to the internal storage of your phone.

2. Download Solid Explorer from the play store. Open it up and hit the jump button at the bottom, then device, then system root.

3. Now scroll down to the system folder, tap it and go into the priv-app folder. Scroll down till you see four files - MotCamera.apk, MotCamera.Odex, MotGallery.apk, & MotGallery.odex. For each one, hold down on it until the option to Rename it pops up, then add ".bak" to the end of each one. (example, MotCamera.odex = MotCamera.odex.bak) SuperSU should pop up asking for root access, grant it of course.


4. When you're done renaming, hit the jump button again, then device> Internal Memory. Inside should be your two files you downloaded earlier. Hit the actions button at the bottom, then select, and highlight the 2 files and hit the copy button at the bottom (the 4th one that looks like two little papers). Now hit Jump> Device> System Root and go into the system folder, then the app folder. Hit actions again and Paste.

5. Stay in the system/app folder, now find you two files you just pasted, and hold down on one of them, then tap Properties, and where it says Attributes hit change. You should only have 4 check-marks here: Read for Owner, Group, and Other... and Write for Owner. Anything else thats checked, uncheck it. Hit ok and do the same for the other one.


7. Now reboot and your'e all done! Now you have a less crappy camera and a smoother gallery app!

Monday, 24 February 2014

How to UNROOT your MOTO G


So, you have rooted your phone but want to revert back to the stock firmware? This guide will show you how to UNROOT your MOTO G.

Note: Unrooting might erase your data its mandatory to keep a backup of your data.


Disclaimer: Follow this steps at your own risk, we don't take responsibility if something goes wrong.


UNROOT:

Before you begin Download the following files:

Follow this steps to get you MOTO G UNROOTED:

  1. Install all the Motorola Drivers which you have downloaded from the above link.
  2. Extract the Stock Firmaware and also the Fastboot, preferably on your Desktop.
  3. Turn on USB debugging on your MOTO G.
  4. Connect your MOTO G via a USB CABLE to your PC.
  5. Click START on your PC and then type CMD.EXE(WINDOWS 7 or LATER) for XP goto START>RUN>CMD.EXE and press ENTER).
  6. Type the following in the command prompt: 
                  adb reboot-bootloader 
    
   7. After your device is booted into bootloader mode type the following codes in the Command Prompt and press ENTER after every command and make sure it returns OKAY.


mfastboot flash partition gpt.bin
mfastboot flash motoboot motoboot.img
mfastboot flash logo logo.bin
mfastboot flash boot boot.img
mfastboot flash recovery recovery.img
mfastboot flash system system.img_sparsechunk1
mfastboot flash system system.img_sparsechunk2
mfastboot flash system system.img_sparsechunk3
mfastboot flash modem NON-HLOS.bin
mfastboot erase modemst1 
mfastboot erase modemst2 
mfastboot flash fsg fsg.mbn
mfastboot erase cache 
mfastboot erase userdata 
mfastboot reboot
                   
 VOILA! Back to the Stock Firmware.
Let US know if this worked for you below in the comments.

Reference : XDA Devlopers

    Saturday, 22 February 2014

    How To ROOT your MOTO G


    The solution to root Moto G is already out in market by MoDaCo’s Paul O’Brien. Before you continue, remember:
      • Unlocking Bootloader may void your warranty
      • Unlocking Bootloader may reset your device(wiping your data)
      • Rooting Moto G may affect future updates

    We will not be responsible for any damage to your device. Follow the procedure on your behalf.

    Guide to Root Moto G:

    Rooting Moto G basically requires you to unlock the bootloader and then root your device.
    Steps to Unlock the Bootloader:
    Before starting, make sure you have downloaded the following drivers and tools:
      • Moto G drivers (Click here to download)
      • Motorola USB Driver (Click here to download)
      • ADB Tools (Click here to download)
    Now follow these steps to unlock the bootloader of Moto G:
    Step 1: 
    First of all, turn your smartphone off
    Step 2: 
    Now, boot it in fastboot mode by holding Volume Down and Power keys simultaneously
    Step 3: 
    Wait for a bit then repeat the last step
    Step 4:
    Now, connect your Moto G with PC via USB
    Step 5: 
    Run Command Prompt and navigate to the folder where you have unzipped ADB Tools
    Step 6:
    Enter the following command,

    fastboot oem get_unlock_data

    Step 7:
    A string of commands will appear, copy this string
    Step 8:
    Paste the sting in the input window on Motorola site (there should be no spaces)
    Step 9:
    Now click on ‘Can my device be unlocked?’, check the option ‘I Agree’ and then click the option ‘Request Unlock Key
    Step 10:
    An unlock key will be sent to your email
    Step 11:
    Enter the following command in Command Prompt:

    fastboot oem unlock {20 characters unlock key}

    Step 12:
    Moto G will automatically reboot with Bootloader unlocked
    Now, it’s time to proceed to root Moto G.
    Steps to Root Moto G:
    Before you begin, make sure you have downloaded the following file:
    • Superboot.zip (Click here to download)
    Here are easy instructions to root Moto G:
    Step 1:
    Boot your Moto G in Bootloader mode (by rebooting your device holding Volume Down and Power keys)
    Step 2:
    Run superboot-windows.bat on PC as Administrator
    Note:    For Mac, open a terminal window to the directory containing the files. Enter the following command,

    chmod +xsuperboot-mac.sh

    followed by,

    sudo ./superboot-mac.sh

    Step 3:
    Your device will now automatically restart with your phone rooted and with SuperSU app
    Congrats! You have successfully rooted the highly powered-budgeted smartphone i.e. Moto G.

    Friday, 21 February 2014

    How to Fix: Wi-Fi won’t connect or drops Inexplicably on MOTO G


    It’s very common to run into Wi-Fi issues with any new phone. Some Moto G owners have encountered issues with connecting to various routers. There are some reports of excessive battery drain when changing between routers. Some people can’t get it to connect to their network at all. There are also several reports of the connection just dropping, even at close proximity to the router. There are an awful lot of potential causes for Wi-Fi problems, so try working through the suggestions below and hopefully you’ll find a fix that works for you.

    Solutions:


    1. That old IT support favorite – turn it off and on again. Try turning the Moto G off and the router off and then switch them both back on again. That will often solve your issues.
    2. If it still won’t connect at all, start by going to Settings > Wi-Fi and long press on your router, then choose Forget network. Scan again and re-enter all your details.
    3. If the connection keeps dropping, go to Settings > Wi-Fi > Advanced and consider changing two settings. Make sure Keep Wi-Fi on during sleep is set to Always. Make sure Avoid poor connections is not ticked.
    4. If battery drain is the problem, try Settings > Wi-Fi > Advanced and set Scanning always available to off.
    5. Make sure that your router firmware is up to date.
    6. To assess whether you need to change channels you can download the Wi-Fi Analyzer app and take a look how crowded it is.
    7. You could try changing the other settings on your router. You might want to make sure that MAC filtering is off, or add your Moto G’s MAC address (you’ll find it in Settings > Wi-Fi > Advanced). You could also try setting a static IP.


    How to Fix: Problem Parsing Package on Moto G


    If you want to install an app from an alternative app store, or anywhere but Google Play (or side-load something), you usually start by going to Settings > Security and scroll down to tick the box next to Unknown sources. However, you may also need to untick the Verify apps box. With the Moto G there have been a lot of people reporting that, even after doing that, when trying to install an app they get a parse error message.

    Try This:


    • If you upload the APK into Google Drive and then install from there on your Moto G then it should work.
    • If your Moto G is rooted, you can use ES File Explorer. Go into the app Settings > App manager and tick install APK automatically and the app will handle it for you.

    Solution:


    • Make sure that all of your important data is backed up and factory reset the phone. You can do this via Settings > Backup & reset > factory Data Reset > Reset Phone. Now uncheck the security options when you are setting the device up again.

    How to Fix: Moto G reboots when charging, or won’t charge


    To keep costs down, Motorola shipped the Moto G without a charger; you just get the standard USB cable. It will work with pretty much any standard charger you may have lying around, but some people have reported problems with the phone rebooting when they plug it in, or refusing to charge when the battery runs down. There have also been reports of the Moto G just turning itself off and not charging.

    Solution:

    This is probably down to the specific charger that you’re using. Try another one and you likely won’t encounter this problem. Ideally, you want a charger rated between 500mA and 1.5A – the higher the rating, the faster it will charge (within these parameters, higher than 1.5A and the Moto G will restrict it anyway).


    If you let your Moto G hit zero and it won’t come back to life, try letting it cool down for a while, then plug in a charger (ideally a different one) and leave it for 20 minutes or so before holding down the power key for 20 seconds.


    How to Fix: Rattling Noises made by Moto G


    We’re seeing this complaint popping up a lot more nowadays for a range of phones. The problem is perceived as an excessive rattling sound when the vibration motor goes off or when the phone is shaken. Some people link it to haptic feedback on the keyboard. For the most part this is harmless; it doesn’t affect the functioning of the device at all, but it may annoy you. The most likely cause is a loose button. You have a couple of options.


    Workarounds:

    • Go to Settings > Sound and you can turn Vibrate on touch off under Keys. You can also turn off Vibrate when ringing. You can also go to Settings > Language & input > Google Keyboard Settings and turn Vibrate on keypress off.

    • Try putting a case on your Moto G, some cases will reduce or completely prevent the rattle.

    • You could open up the back cover and put a small piece of paper or tape in the space between the buttons and the back cover. This should prevent any excessive rattling.


    Potential solution:

    • If it is really bothering you, contact your retailer and try to arrange a replacement phone. You may get a Moto G with no audible rattle, or you might find the same problem again.

    How to fix: Notification LED on MOTO G not working


    A number of people have run into a bug with the notification LED on the Moto G. Their notification light won’t ever turn on, regardless of incoming texts, emails, and calls. As best we can tell, this is caused by restoring settings from a Google account, which could include an instruction from an older phone where the LED was disabled, or nonexistent.


    FIX:

    • Motorola released a widget called Notification Light Widget.

    • Stick it on your home screen, use it to enable the LED, 

    • and then you can get rid of it.


    Notification Light Widget


    Notification Light Widget is a tool to enable/disable LED notification light on Android devices.On some devices (such as Motorola Moto G), a small number of users found that the notification light was disabled after logging into their google account if it was disabled previously on other devices with the same google account. This widget restores the ability to control the light on devices without an exposed setting.

    On other android devices that already support control of the LED notification light, this widget could also be used as a convenient tool to enable/disable the LED notification light from the homescreen.

    Download Link :

    Thursday, 20 February 2014

    Get FM RADIO for you MOTO G


    Maybe it is a surprise for you when you noticed you can use FM radio on Moto G. Nowadays, most smartphones do not provide FM radios anymore.  This guide teaches you how to use FM radio on Moto G, and some tips and tricks of using FM radio on Moto G.


    If you cannot find the FM radio app on your Moto G, you can install the app from Google Play Store here: Motorola FM Radio. Of course, it is free. The version of this app on Google Play store is newer than the stock one. So, even you can find the app on your Moto G, you may try to update it to Google Play one to get all features and achieve the best  performance.
    Once Motorola FM Radio app is installed on your Moto G, you can start to use FM radio on Moto G just like any other apps.

    How-to use 'OK GOOGLE' for activating GOOGLE NOW in your Moto G


     If you've seen the new Moto X and wish you could get Touch-less Control for your phone, Open Mic+ can bring it to you. The app lets you set a voice phrase that it'll listen for, integrates with Google Now for voice searches, and even integrates with Tasker for more advanced actions.

    Open Mic+ is fairly straight forward. The default key phrase is "Okay Google," after which the app will launch, hand you off to Google Now, and tell it to listen for your next command. It works pretty well, and almost as seamlessly as the touch-less control built-in to the new Moto X. If you're worried about battery life, you can toggle the app on or off as you see fit, but by default the app runs quietly in the background so it's always available. It uses offline voice recognition, so you don't need internet access to use it. If you're a tasker fan, you can integrate the app with Tasker actions, so you can use different voice commands to execute Tasker actions you've built.


    The app is available now, completely free, and ad-free. It's new and under development, so expect changes along the way, but we tried it out and it works like a charm. Hit the link below to grab it.


    Download :

    PlayStore